יחסים ורול-אפים

האם אי פעם רציתם לחבר את הנתונים בין שתי טבלאות? זה יום המזל שלכם! מאפיין היחס של Notion נועד לעזור לכם לבטא קשרים שימושיים בין פריטים במאגרי ידע שונים 🛠
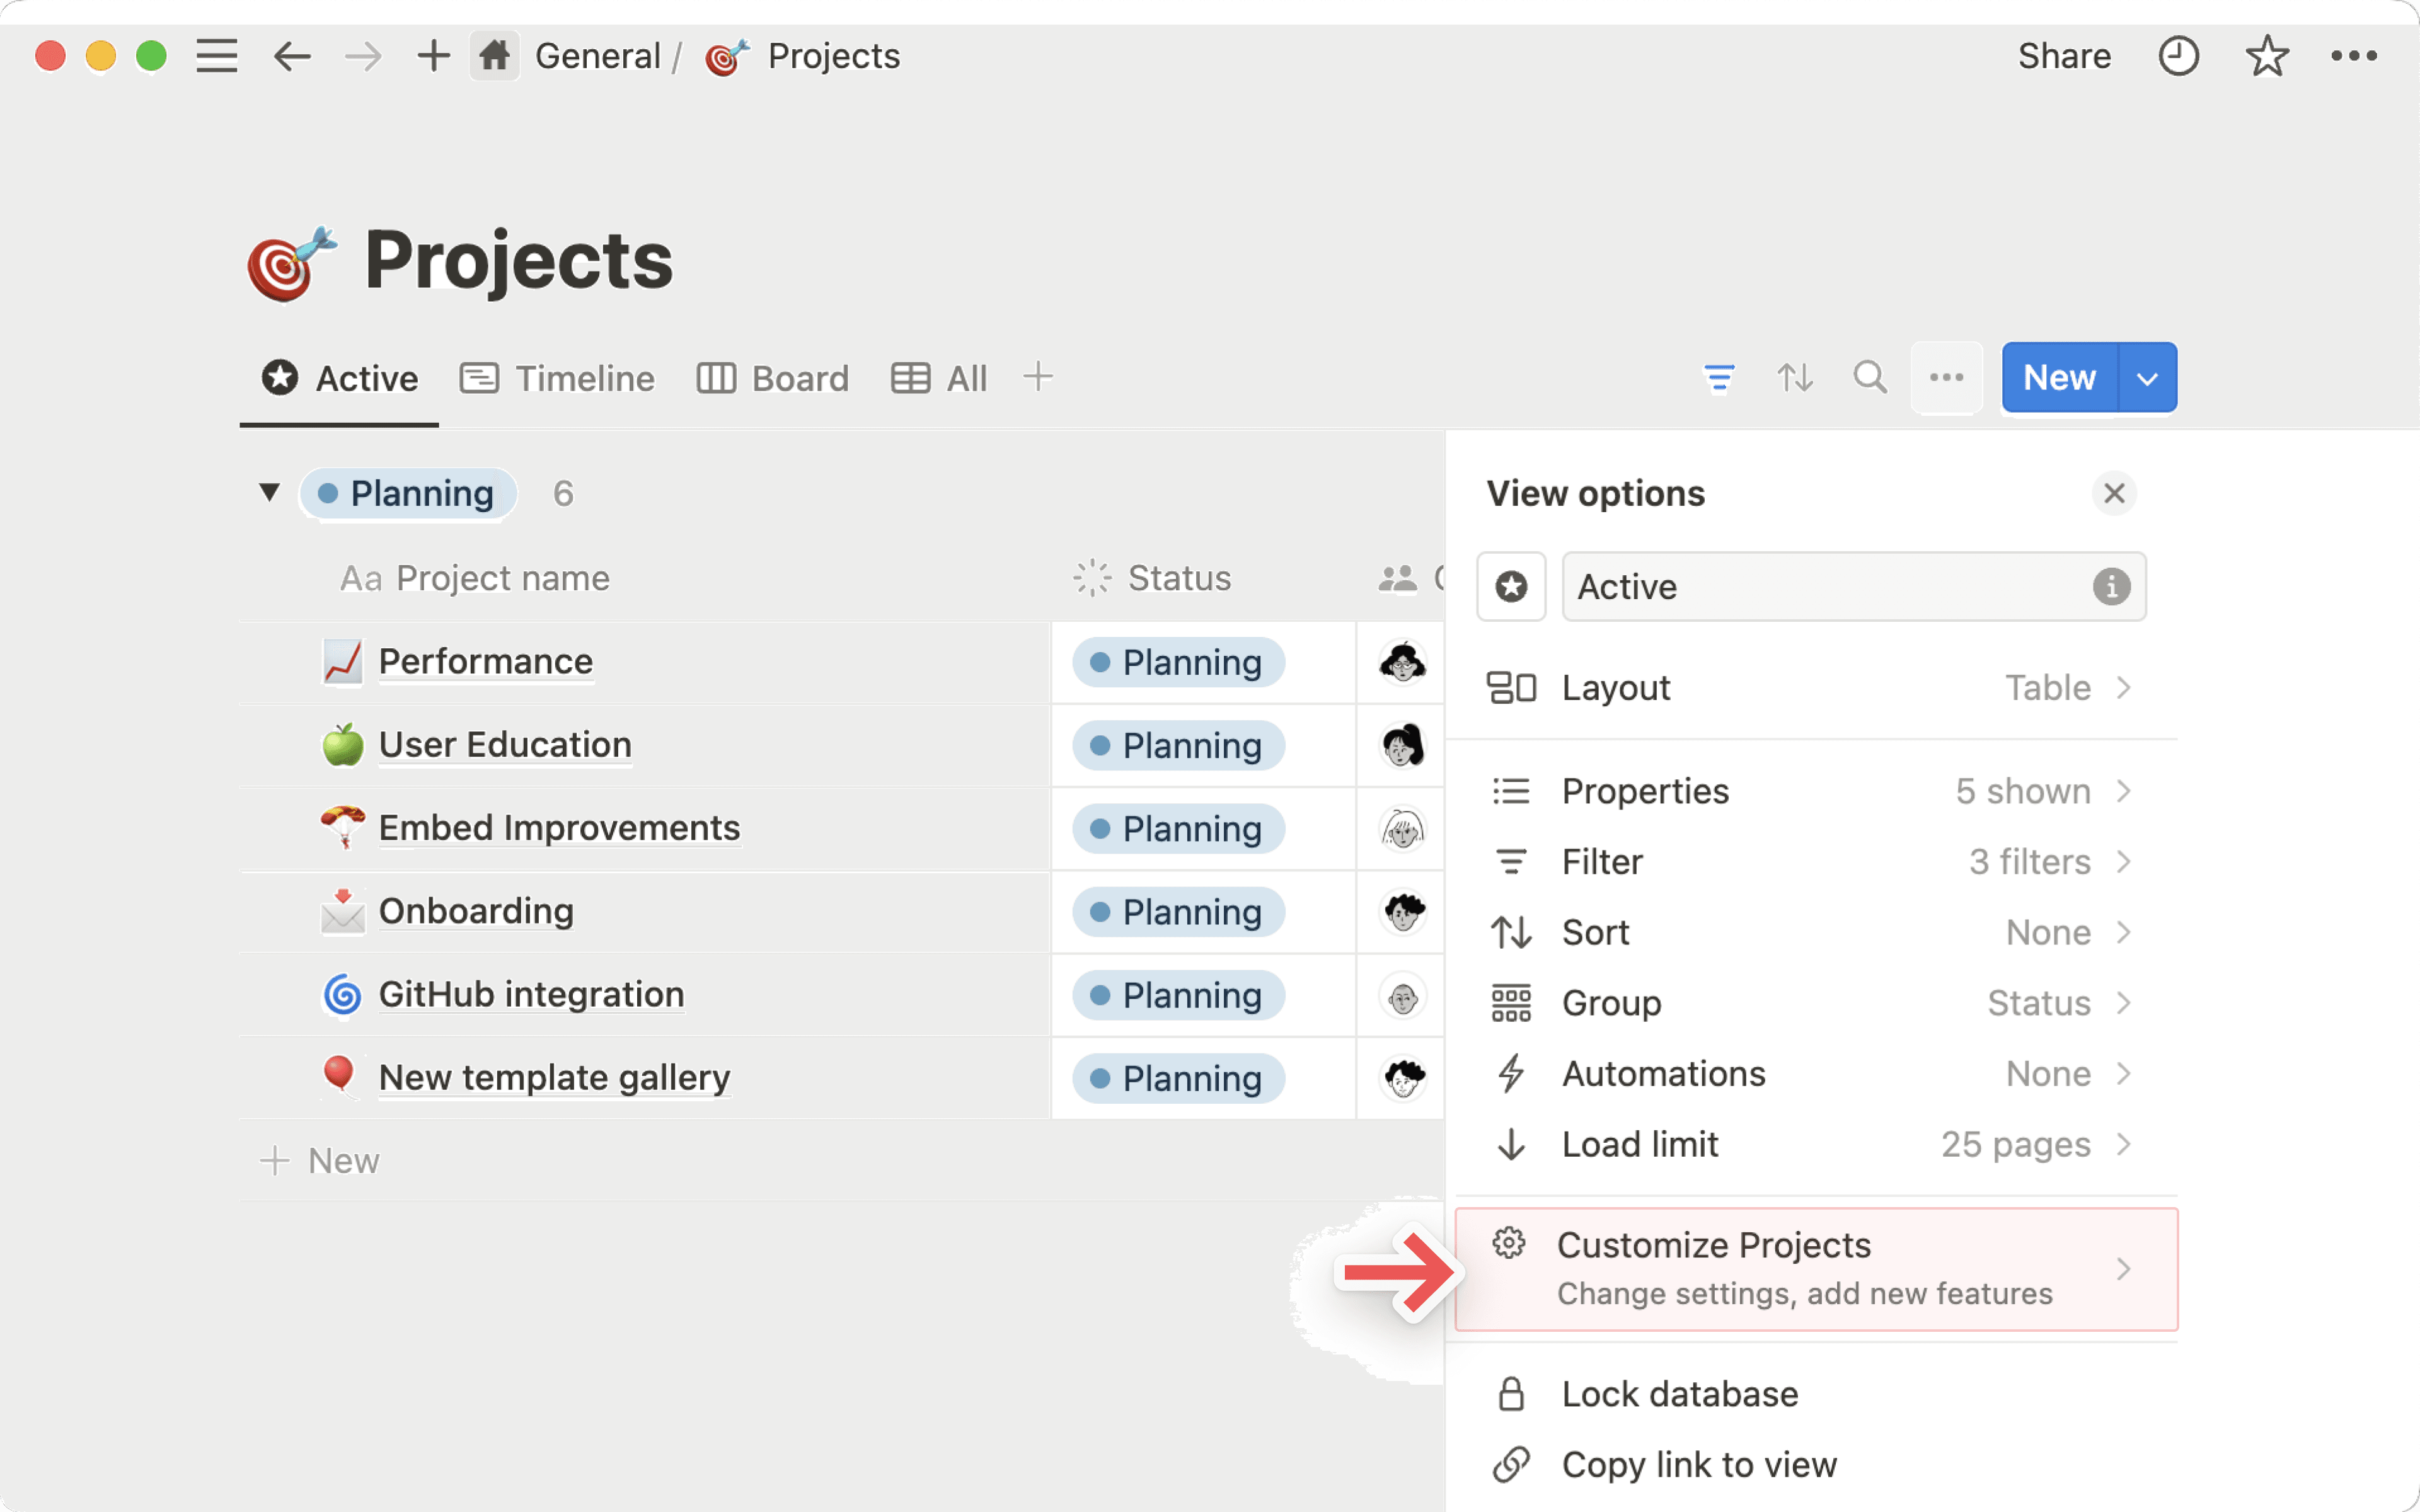
מעבר לשאלות הנפוצות
רוצים לראות מספר קבוצות נתונים בתוך אותו מאגר ידע? אפשר להוסיף מקור נתונים חדש או לקשר מקור נתונים קיים למאגר ידע שכבר בשימוש. מידע נוסף זמין כאן ←
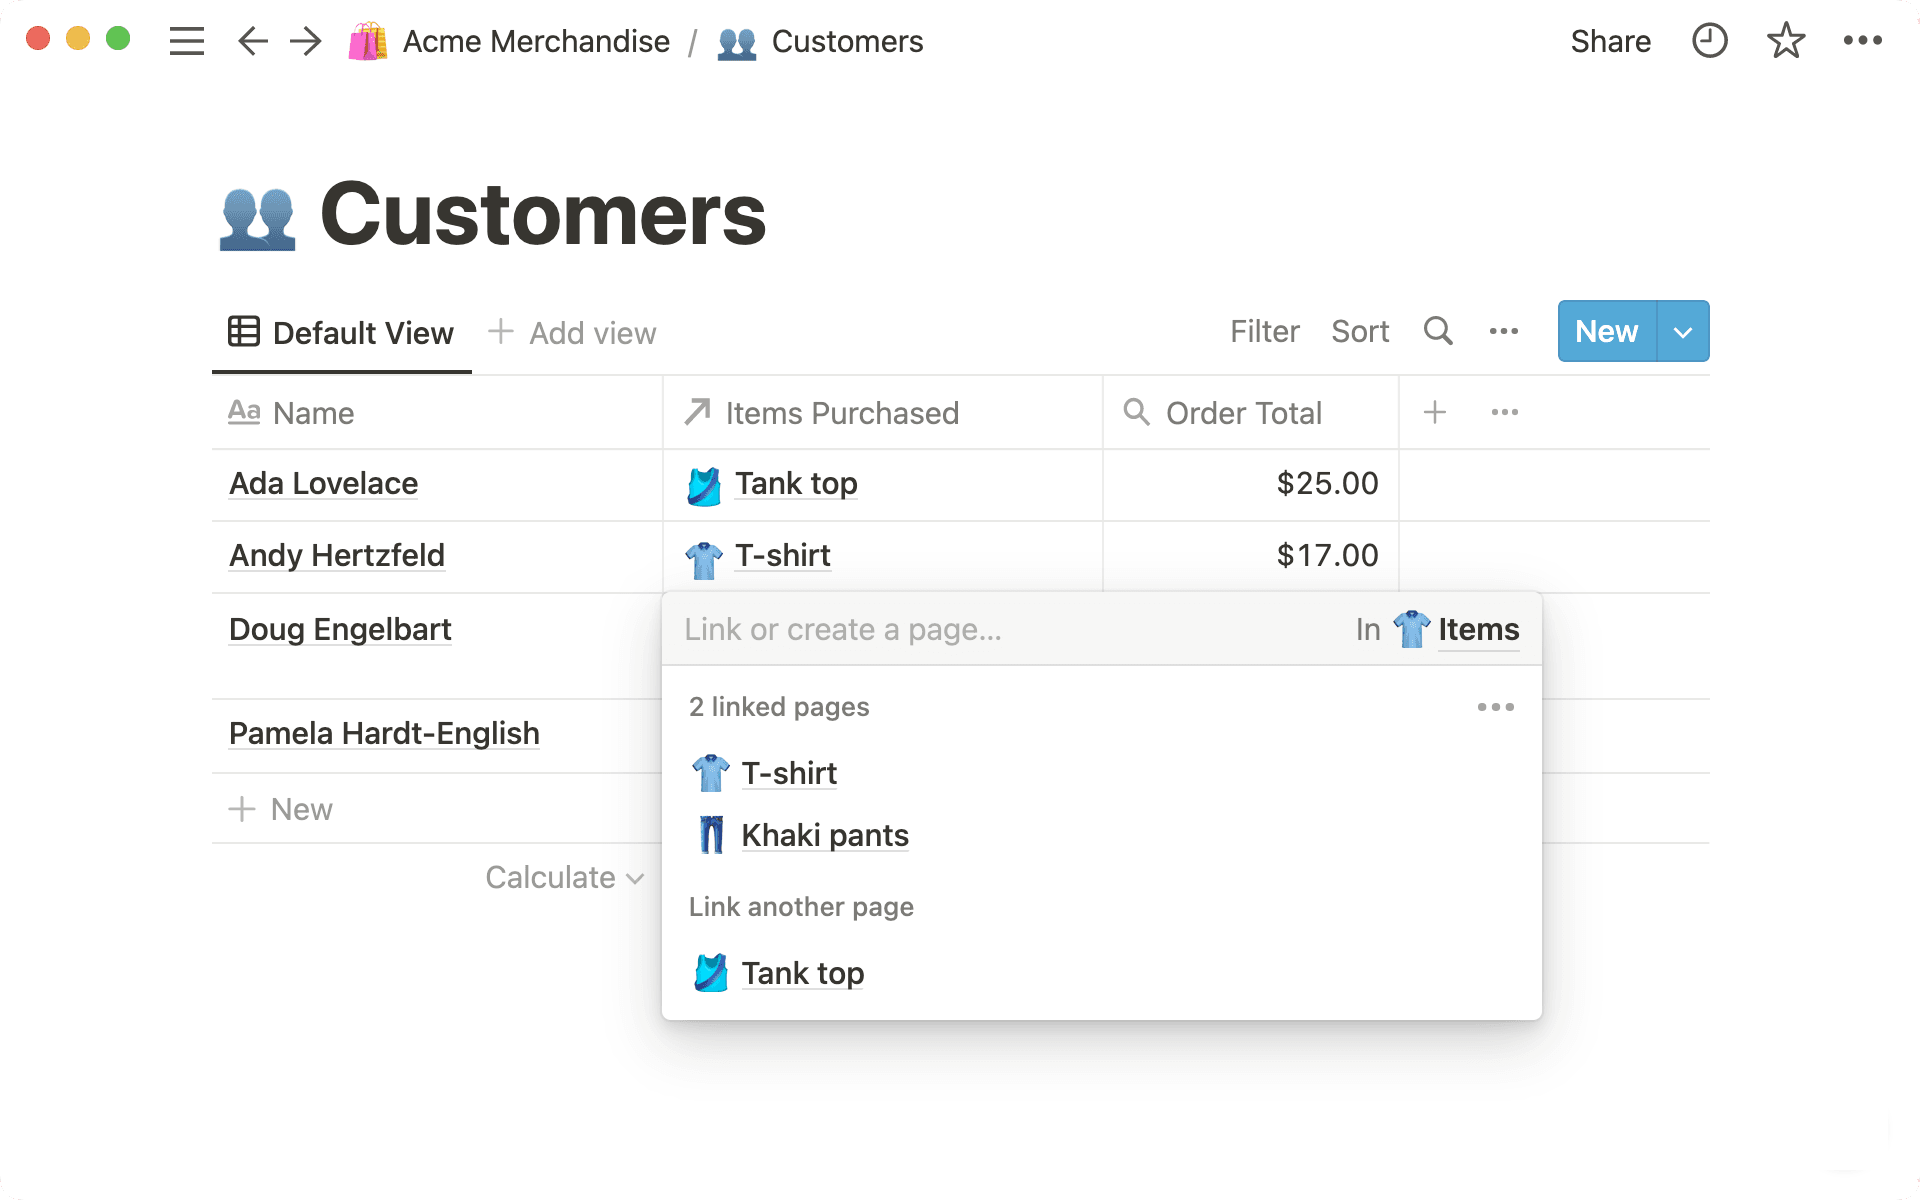
Let's say you have two databases for your theoretical business 😉
One that tracks customers
One that tracks items purchased
You want to know both which customers bought which items, as well as which items were purchased by which customers. This is a job for relations!
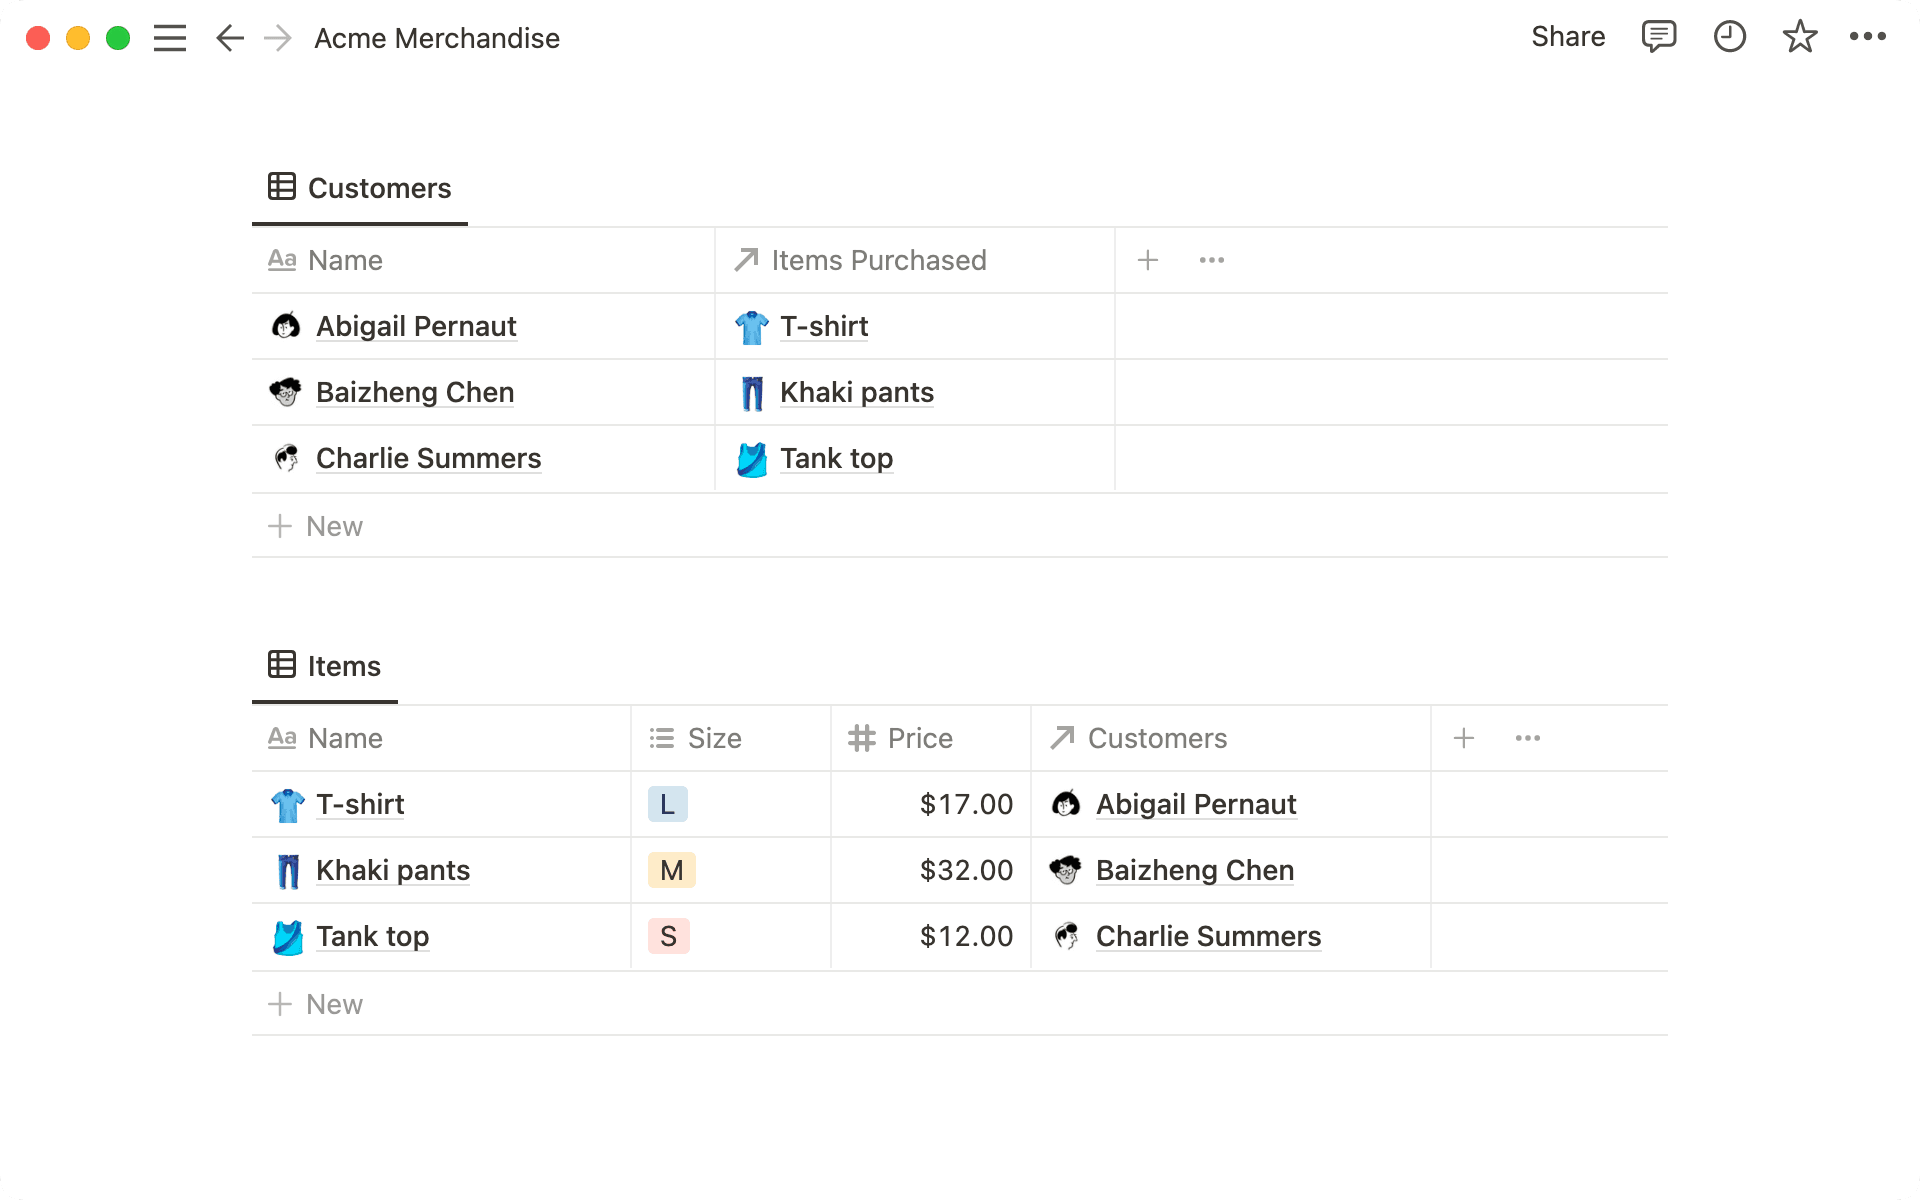
In the two tables above, the columns labeled
↗ Items Purchasedand↗ Customersare relation properties, which can be added like any other database property.Here, when you add an item bought into the Customers database, the customers who bought them automatically appear in the
↗ Customerscolumn in the Items database.
Example use cases
Connect your database of restaurants with your database of neighborhoods so you can see which restaurants are in which neighborhoods at a glance.
Connect your database of meeting notes with your database of clients to provide quick access to the notes relevant to each client.
Connect your database of tasks with your database of bigger projects to understand how projects are broken down into tasks, and how tasks contribute to projects.
Connect your database of candidates with your database of interviewers to keep track of who interviewed whom.
To relate two databases, you need two databases. So let's assume you've made the Customers and Items databases above for the purpose of this walkthrough.
Add a new column/property to your Customers database and give it a name, like Items Purchased.
Search for
Relation.Then, search for the database you want to create the relation with.
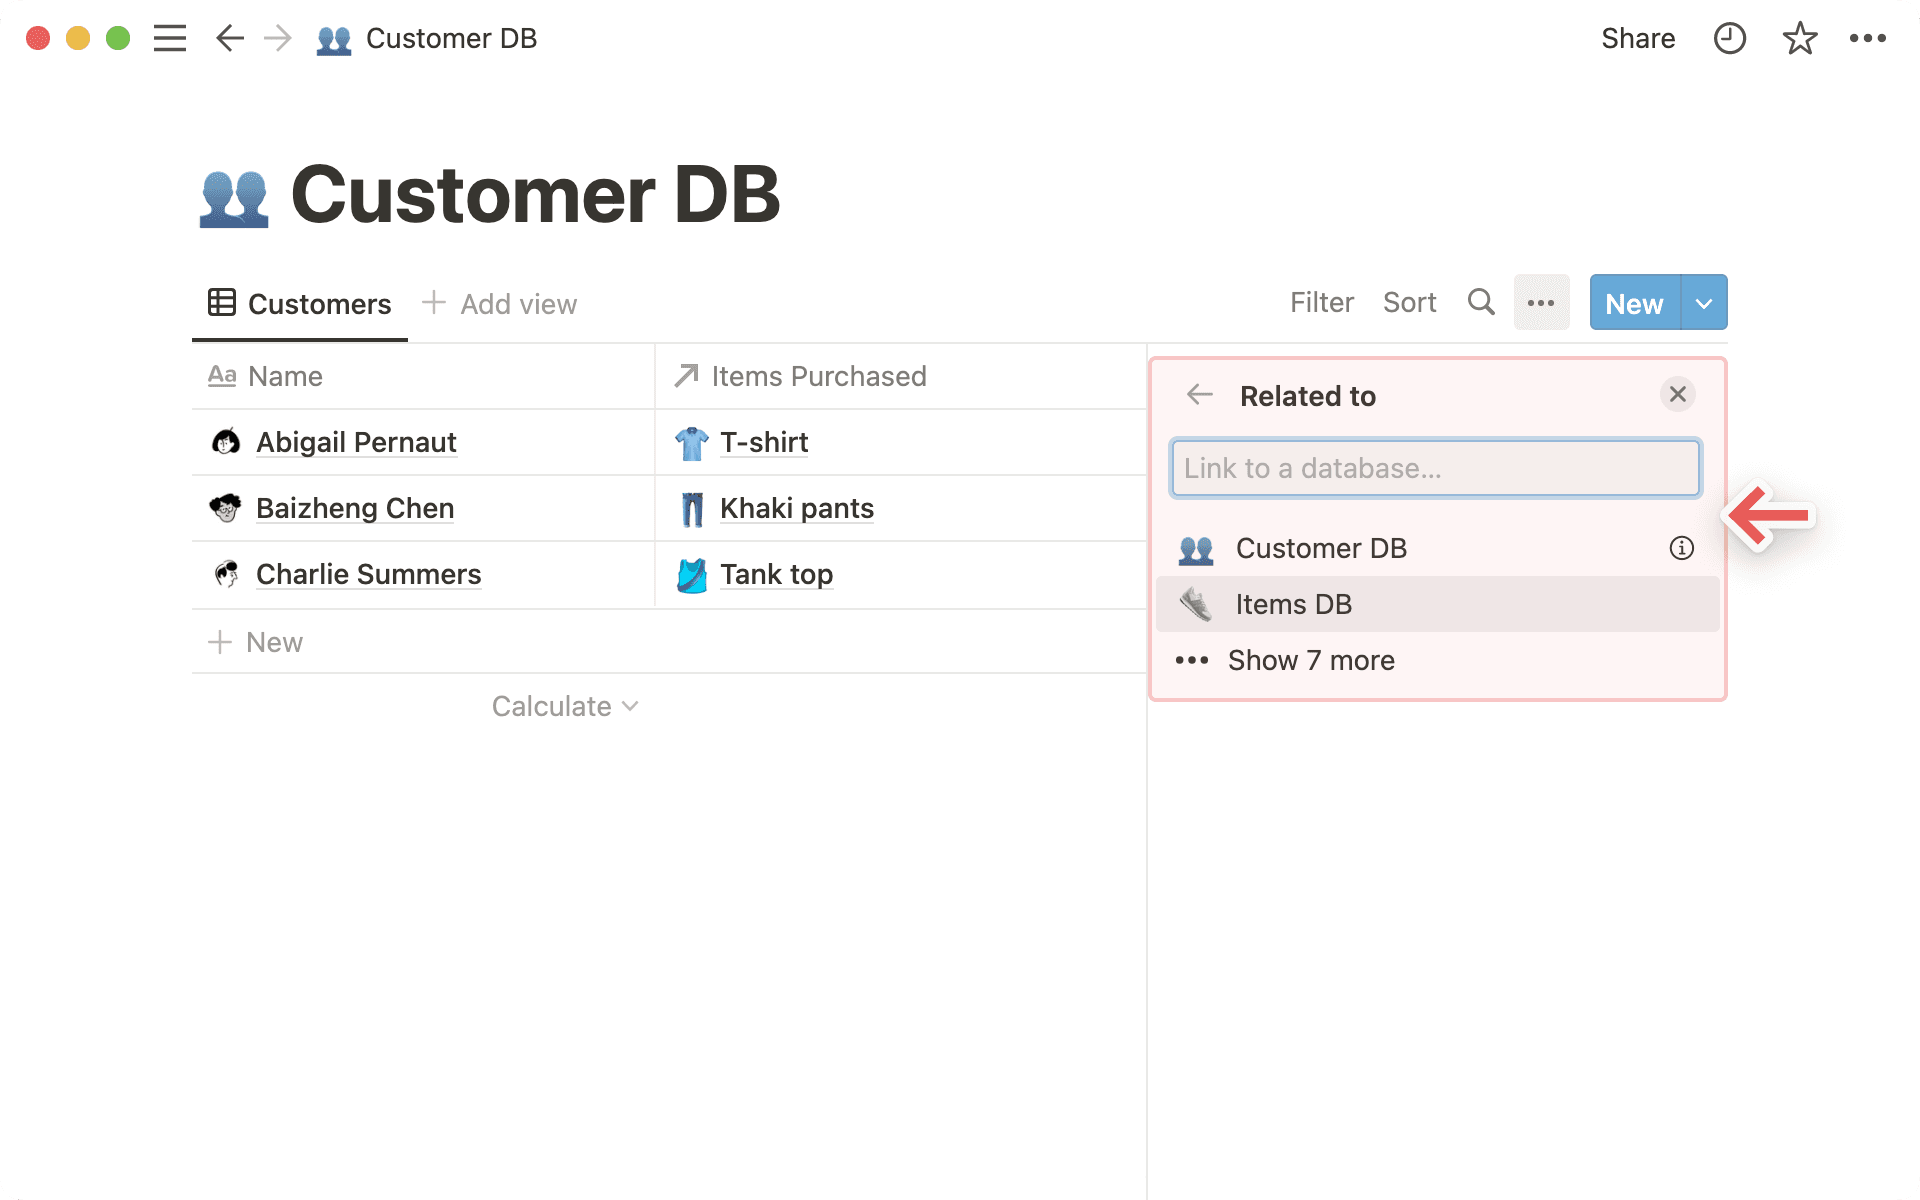
You'll see a preview of the relation. In this case, we've created a relation from the Customer database to the Items database.
Click the blue
Add relationbutton to finalize the creation of the new relation property.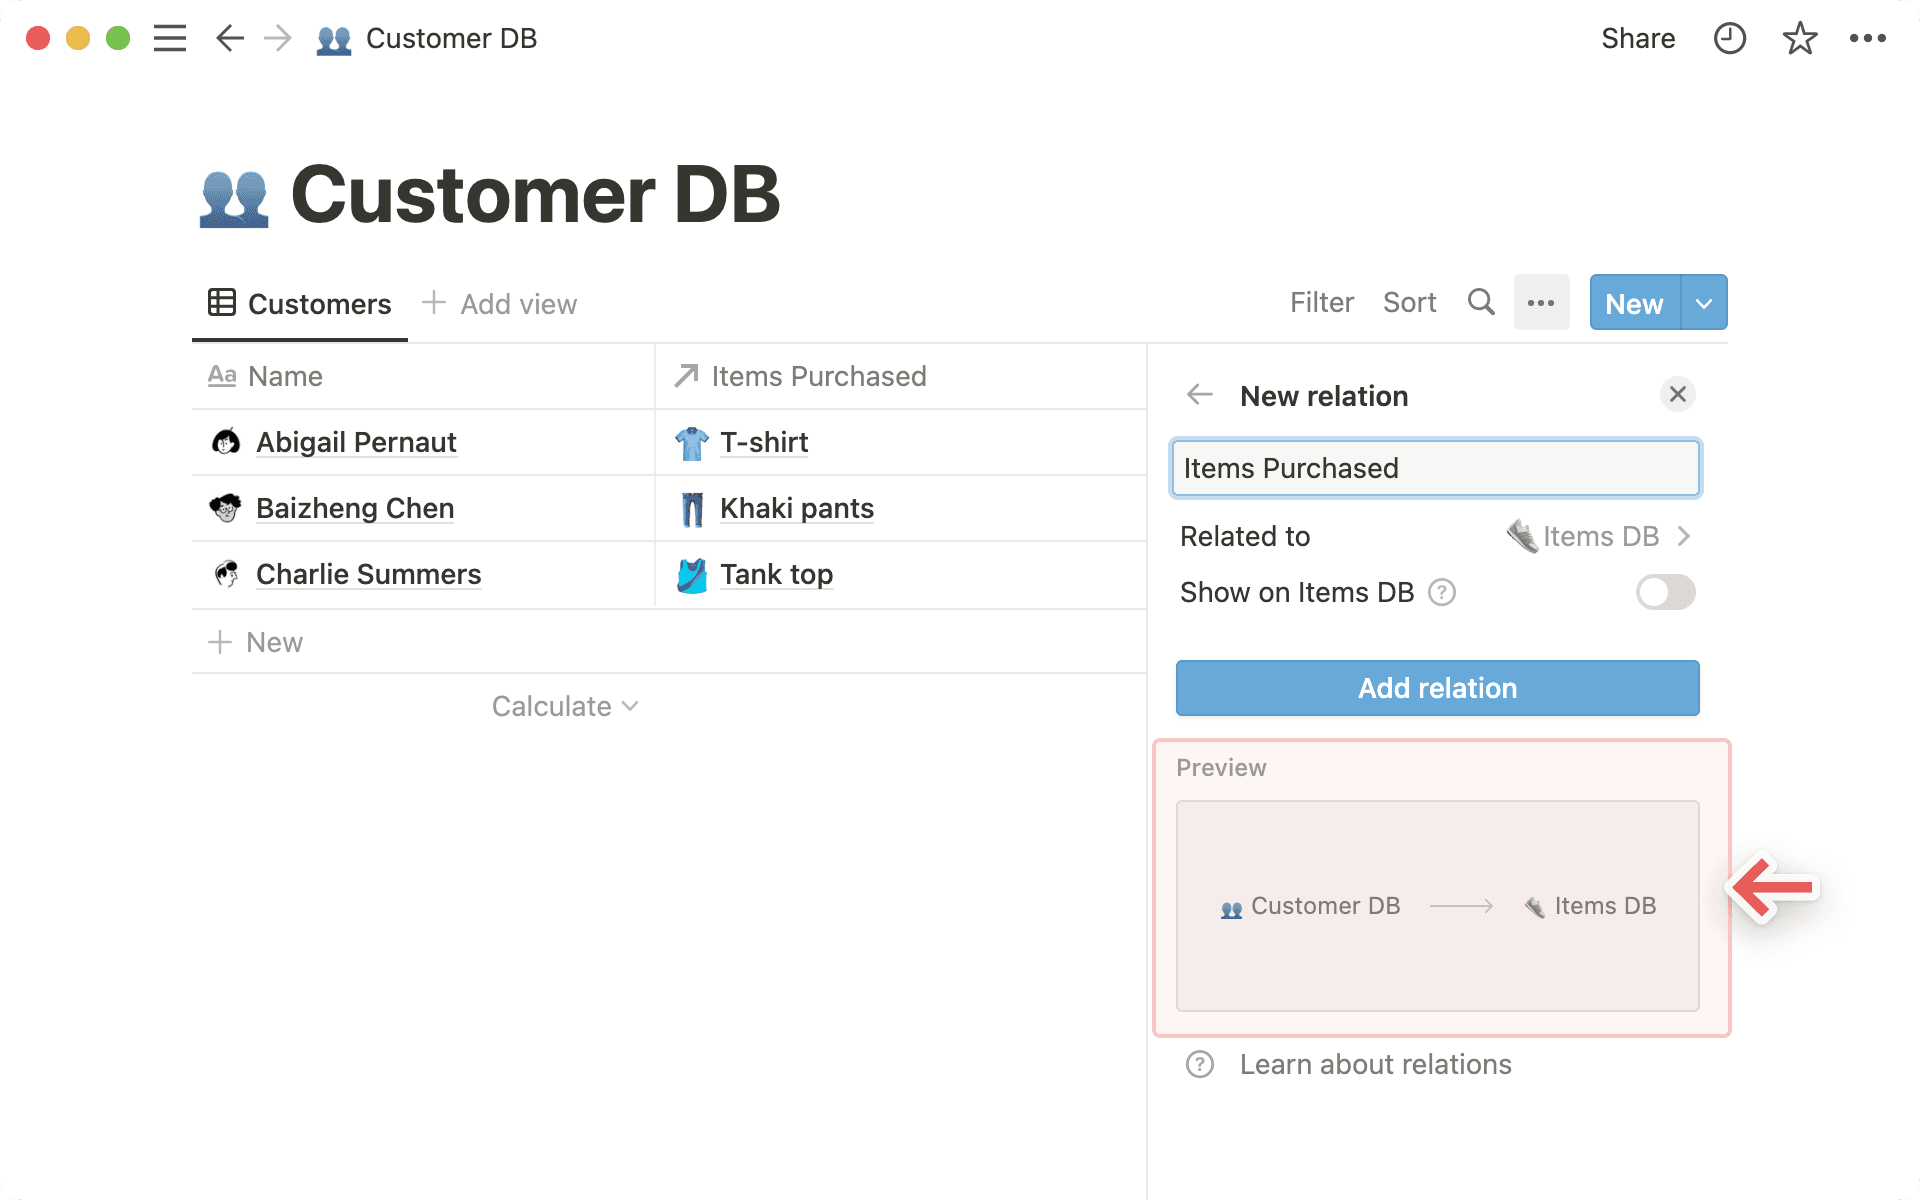
Now when you click in a cell in this relation column, you'll bring up a menu where you can search for and choose items from the other database to add.
For example, this is how you can add which clothes each customer bought.
To add an item, click the name in the list. To delete an item, hover over and then click the
–button on the right.
טיפ: כדי לשנות את מאגר הידע שאליו אתם מתחברים, יש לבחור מחדש את היחס כסוג המאפיין עבור מאפיין זה בפרט. תתבקשו לבחור מאגר ידע חדש.
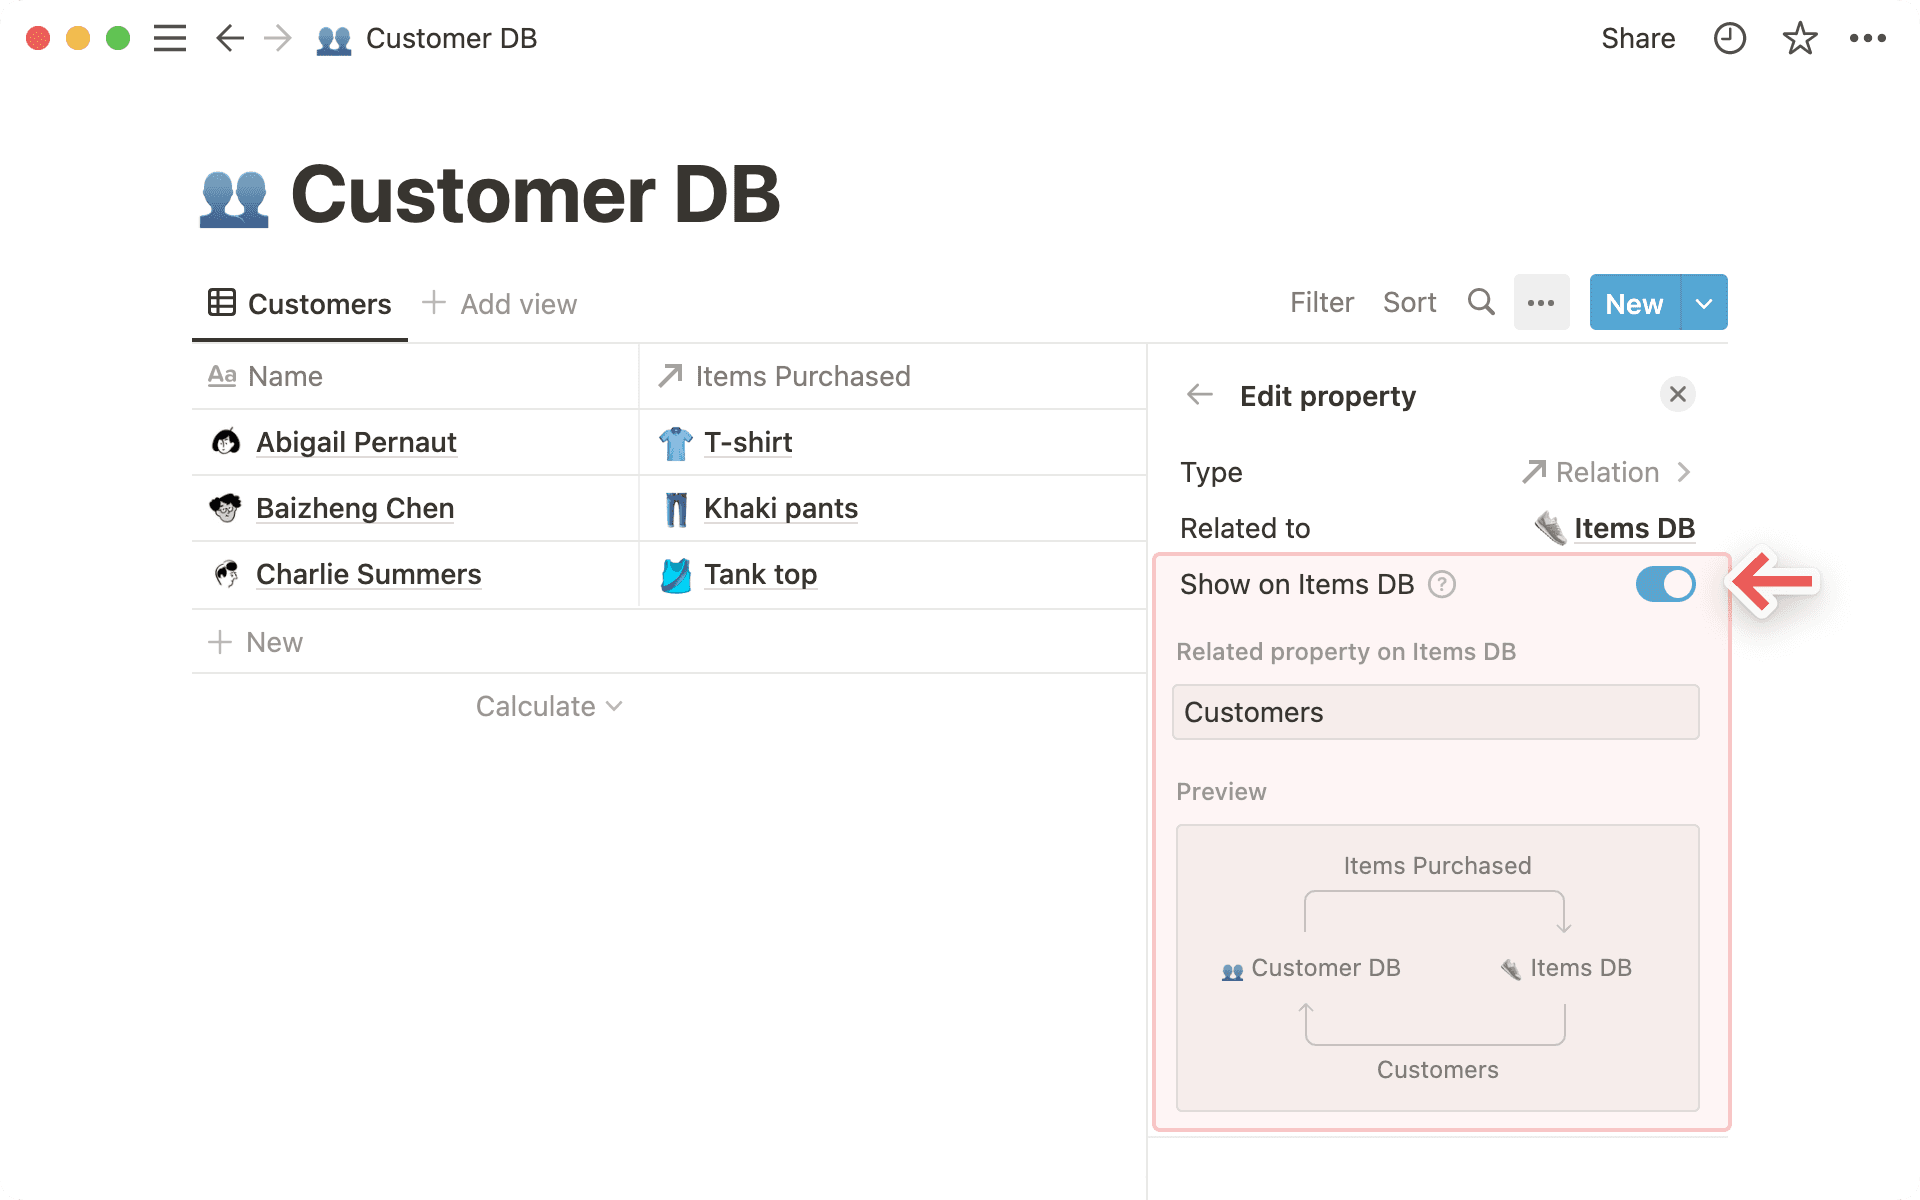
Relations are created as one-way by default. But you can easily toggle on a corresponding relation in the destination database.
With two-way relations, the edits work both ways! So if you add a customer to the Items database in the relation column, the change pops up in your Customers database.
Follow the above instructions to create a new relation property.
Click the toggle that says
Show on [name of related database]. In our example, this saysShow on Items DB.Give this corresponding relation a name.
Below, you'll see a preview of the two-way relation. In this case, we've created a relation from the Customer database to the Items database, and a relation from the Items database to the Customer database.
Click the blue
Add relationbutton to finalize the creation of these two new relation properties.
When you create a relation, you're essentially adding Notion pages stored in one database into the property field of another.
These pages can be opened and edited like any other! Click on the page in the relation column. Then click on it again in the window that pops up.
You can also remove any related page by hovering over and clicking the
–at the right.
You can choose to limit the number of pages that can be included in your relations property – with the option to select
1 pageor to haveNo limit.If you select the option to limit it to
1 page, people using your database will only be able to select 1 page in the relation. This is especially useful for situations where only one page should be related to one another, for example - if only one order number should be associated with each purchase.
To change how relations are displayed in a database page:
While in a database page, click on the relation.
Click
Property visibilityand selectAlways show,Hide when empty, orAlways hide.
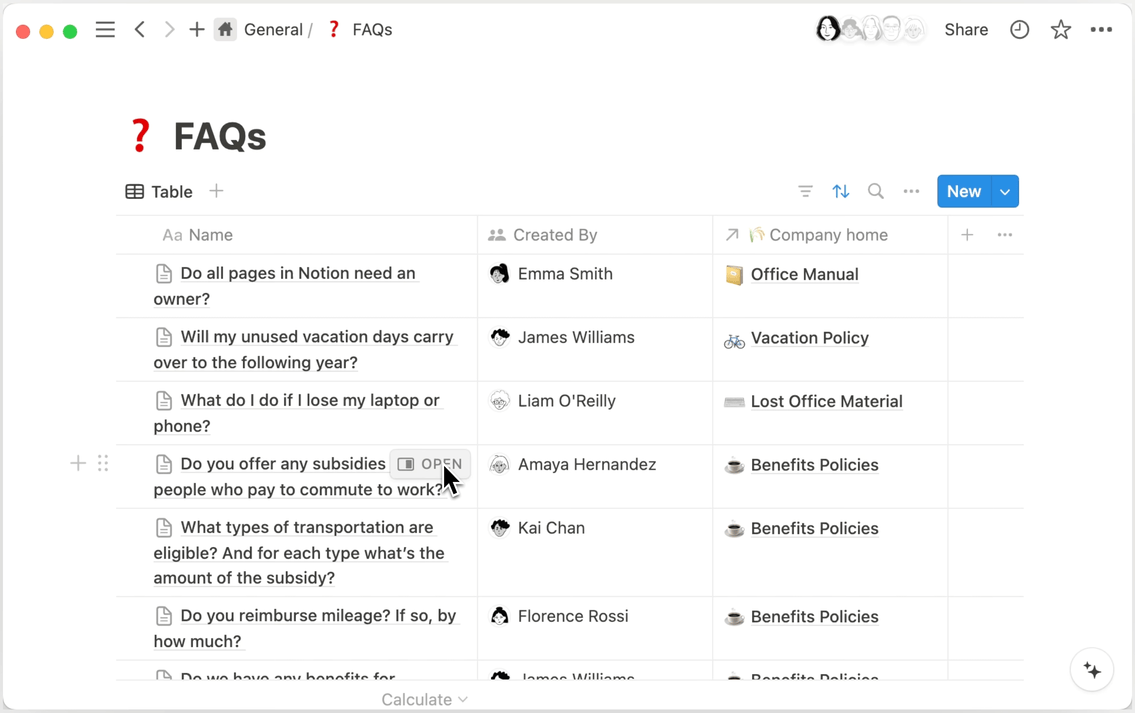
Customize displayed properties for relations
When you set up a relation in your database, you can also choose to display certain properties of linked pages. For example, let’s say you have a database of frequently asked questions at your company. Each FAQ has a relation to a page that further explains the answer to the question. You might want people to also be able to see the owner of each page, so they know who to reach out to with more questions. You can set your FAQ database up so that the owner is visible along with the relevant page!
To do this:
Open a page in a database that has a relation property.
Click the field next to that property to link a page → click
•••.In the menu that appears, drag the properties of the related database into or out of
Shown in relationorHidden in relation.Once you’re done, you’ll see your desired properties appear in the relation field. This will apply to all of the pages in your current database.
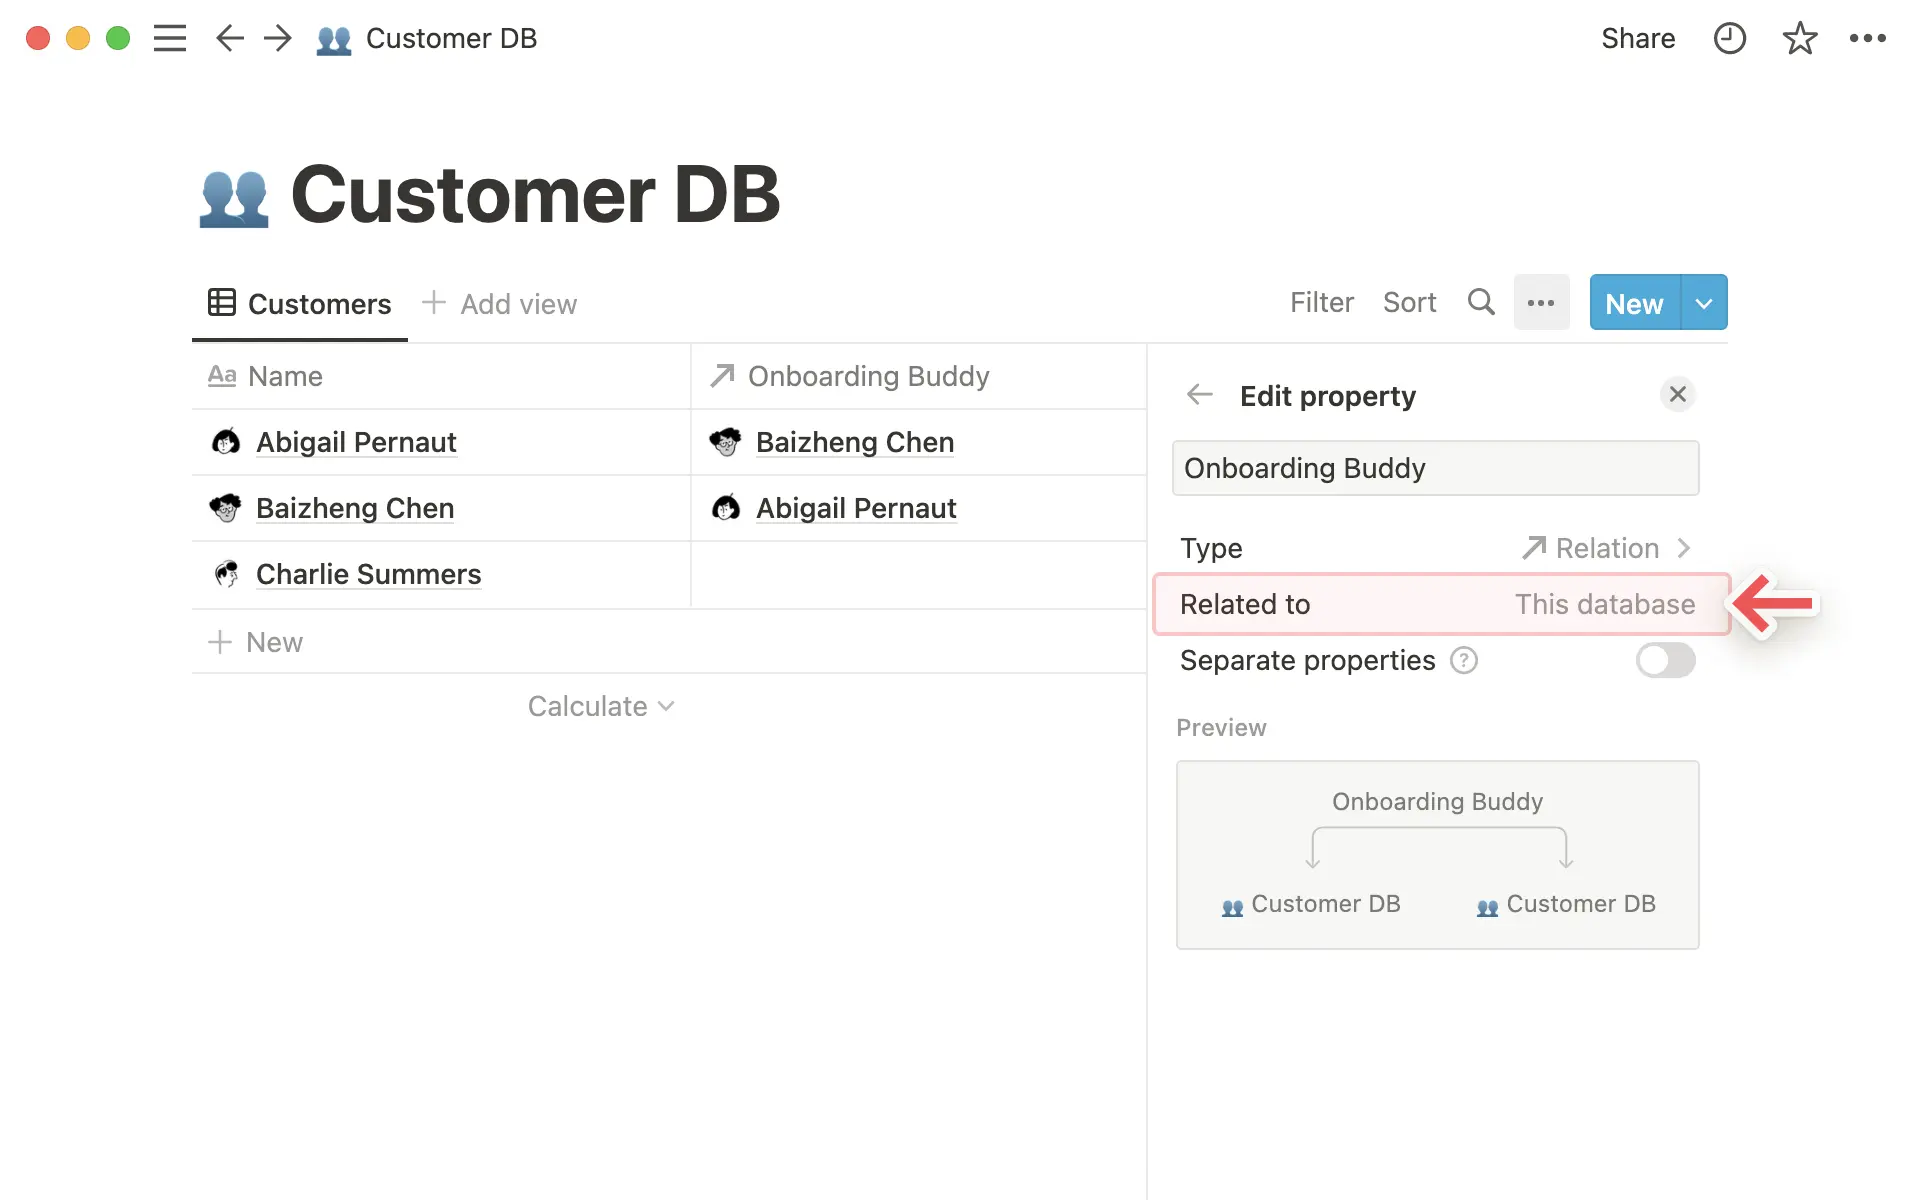
Let's say you want items in the same database to have relationships with each other. For example, you have a tasks database and you want each task to relate to other tasks.
Start off by creating a new relation.
Then search for and choose the database you're currently working in.
You'll now see that the database is related to
This database.When relating a database to itself, we recommend toggling off
Two-way relationas it essentially duplicate the property.
Rollups help you aggregate data in your databases based on relations. Going back to our customers and items example above, let's say you wanted to know how much each customer spent based on what they bought.
First, create the relation so you know who bought what.
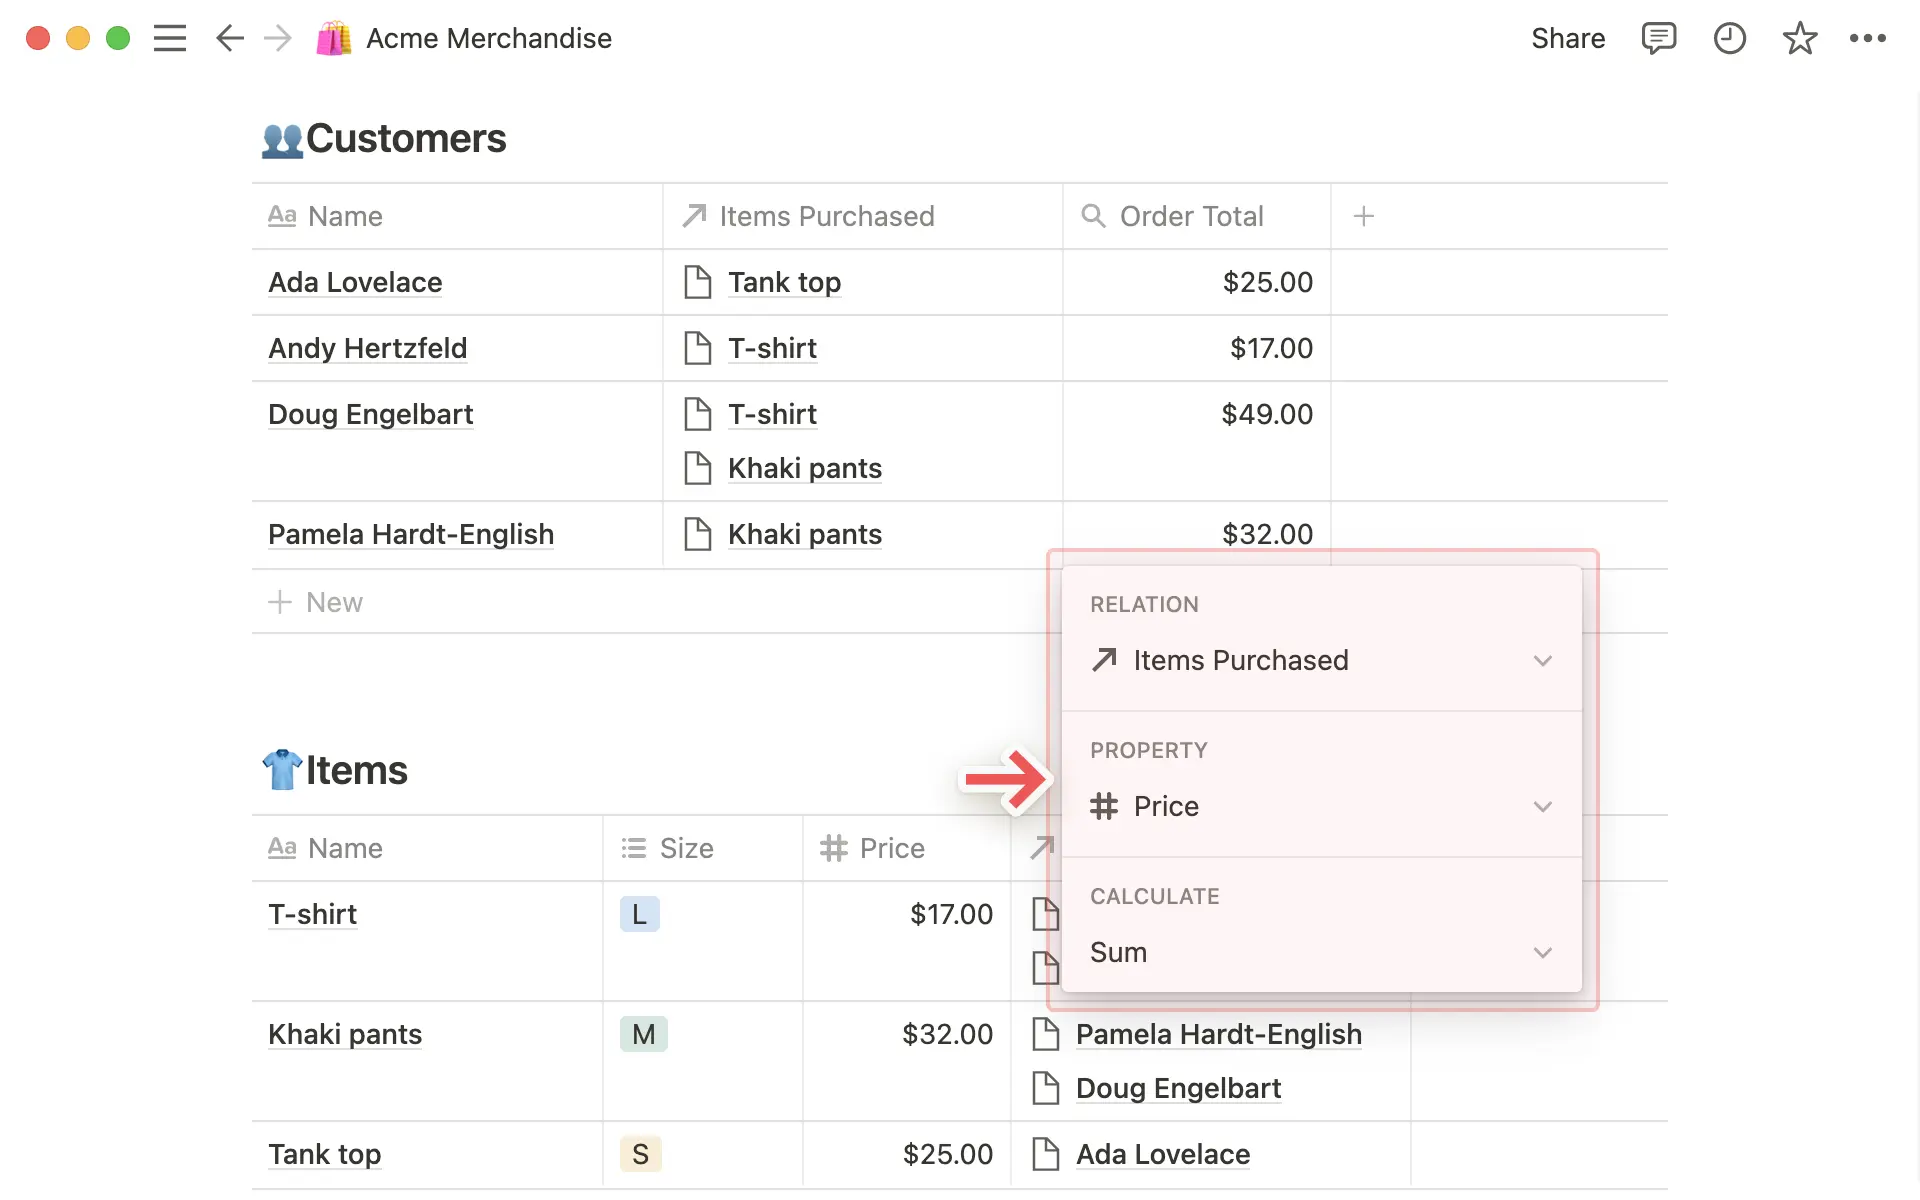
Add a new column/property and choose
Rollupfrom theProperty typemenu. Give it a descriptive name.
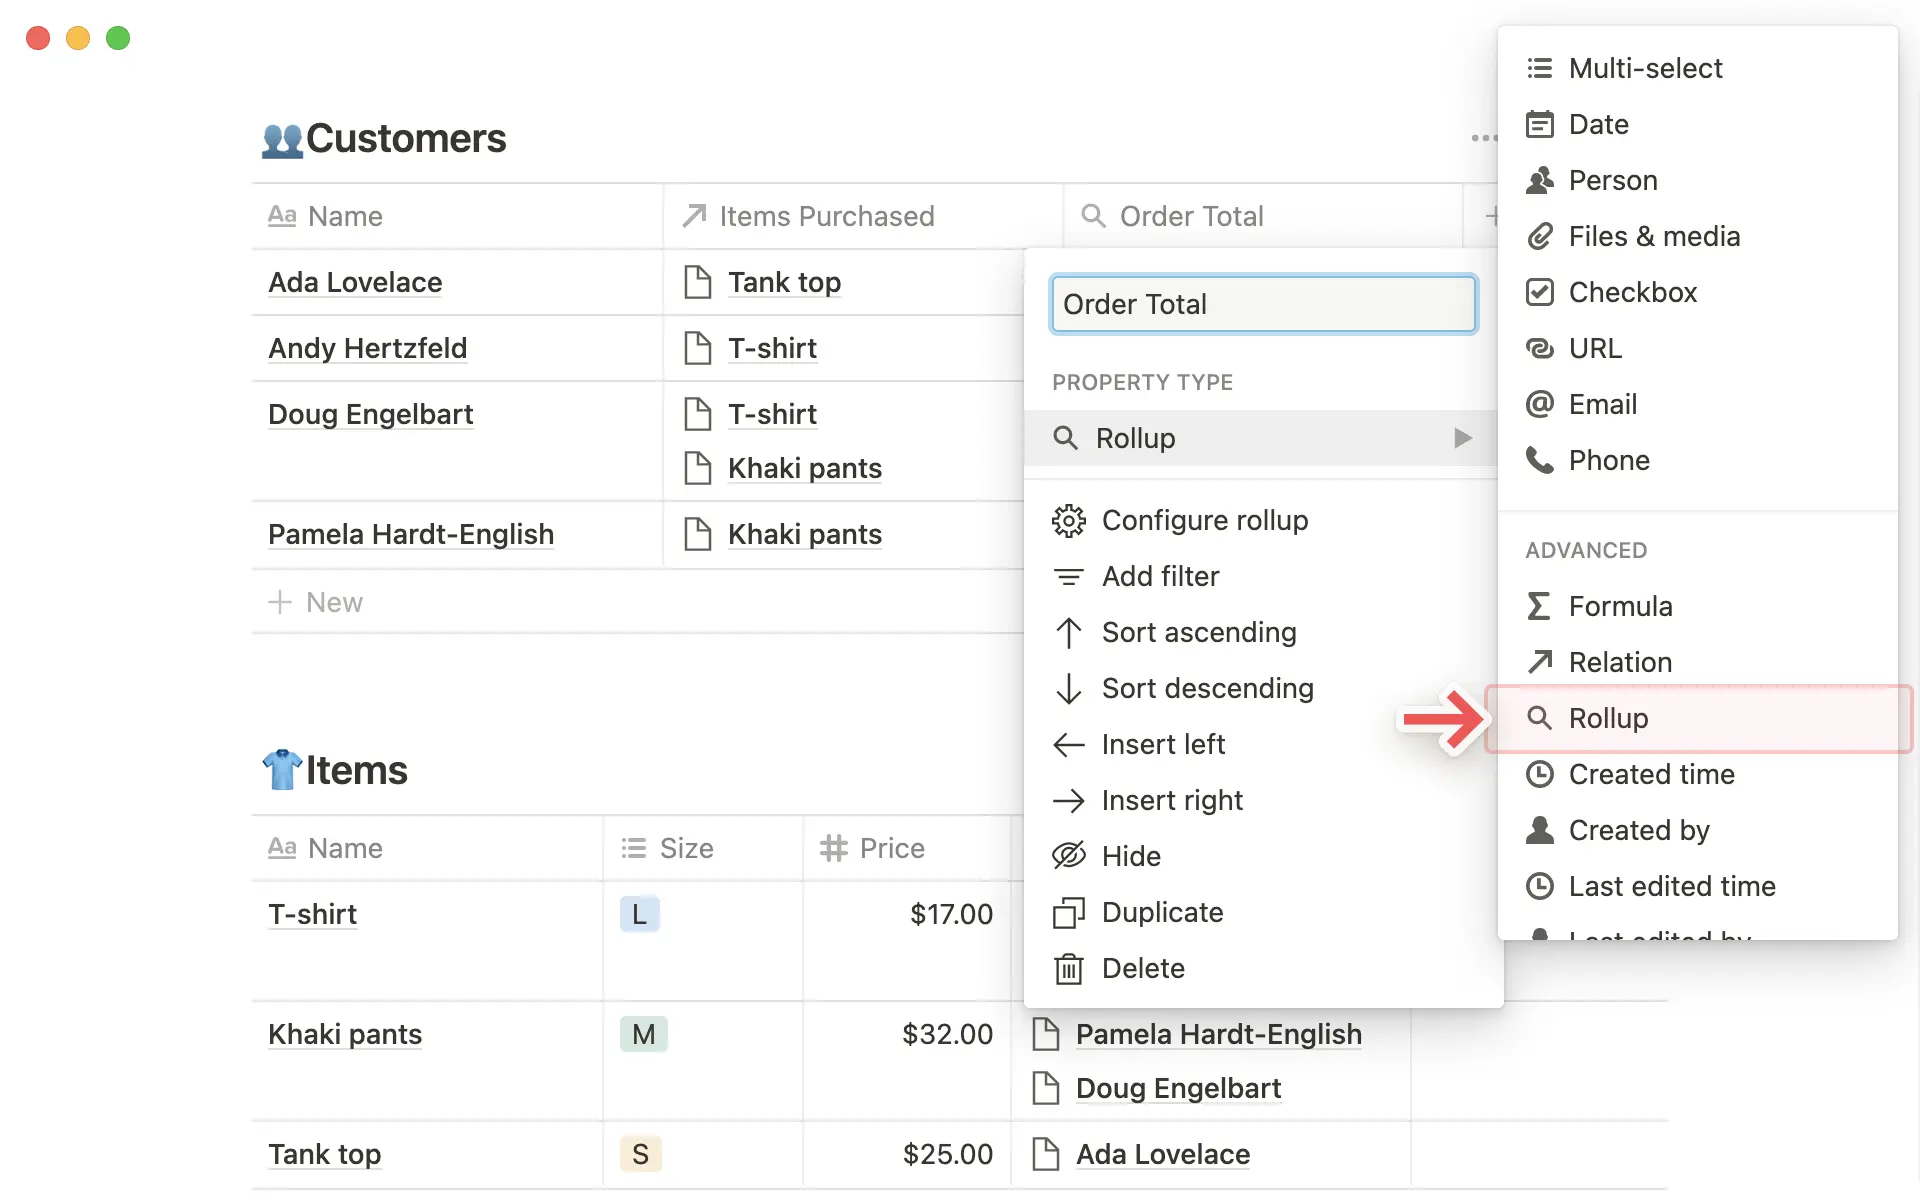
Clicking on any cell in the rollup column will bring up a new menu asking you for:
The relation property you want to roll up.
The property of those related pages you want to roll up.
The calculation you want to apply to them.
The number formatting you want to display.
The decimal point placement you want to set.
So, for our example, you'd choose to roll up the relation property
Items Purchasedand thePriceproperty within those pages. Then you'd chooseSumas the calculation, theNumber format, and lastly where to place your decimal point.Doing this adds up the prices of each item related to a customer's name, giving you the total dollars they spent in your rollup column.
Rollup types
There are different calculations you can apply as a rollup. Here are all of them:
Show original: This just shows all related pages in the same cell. It's the same as the relation property itself.Show unique values: This shows each unique value in the selected property for all related pages.Count all: Counts the total number of values in the selected property for all related pages.Count values: Counts the number of non-empty values in the selected property for all related pages.Count unique values: Counts the number of unique values in the selected property for all related pages.Count empty: Counts the number of related pages with an empty value for the property selected. So, if one item a customer bought didn't have a price and that was the property selected, the rollup column would say 1.Count not empty: Counts the number of related pages with assigned values for the property you selected.Percent empty: Shows the percentage of related pages with no value in the property you selected.Percent not empty: Shows the percentage of related pages with a value in the property you selected.

הערה: ניתן למיין רול-אפים רק כאשר הם מפיקים ערך מספרי.
These rollup calculations are only available for Number properties:
Sum: Computes the sum of the numeric properties for related pages (like above).Average: Computes the average of the numeric properties for related pages.Median: Finds the median of the numeric properties for related pages.Min: Finds the lowest number in the numeric property for related pages.Max: Finds the highest number in the numeric property for related pages.Range: Computes the range between the highest and lowest numbers in the numeric property for related pages (Max-Min).
These rollup calculations are only available for Date properties:
Earliest date: Finds the earliest date/time in the date property for all related pages.Latest date: Finds the latest date/time in the date property for all related pages.Date range: Computes the span of time between the latest and earliest dates in the date property for related pages.
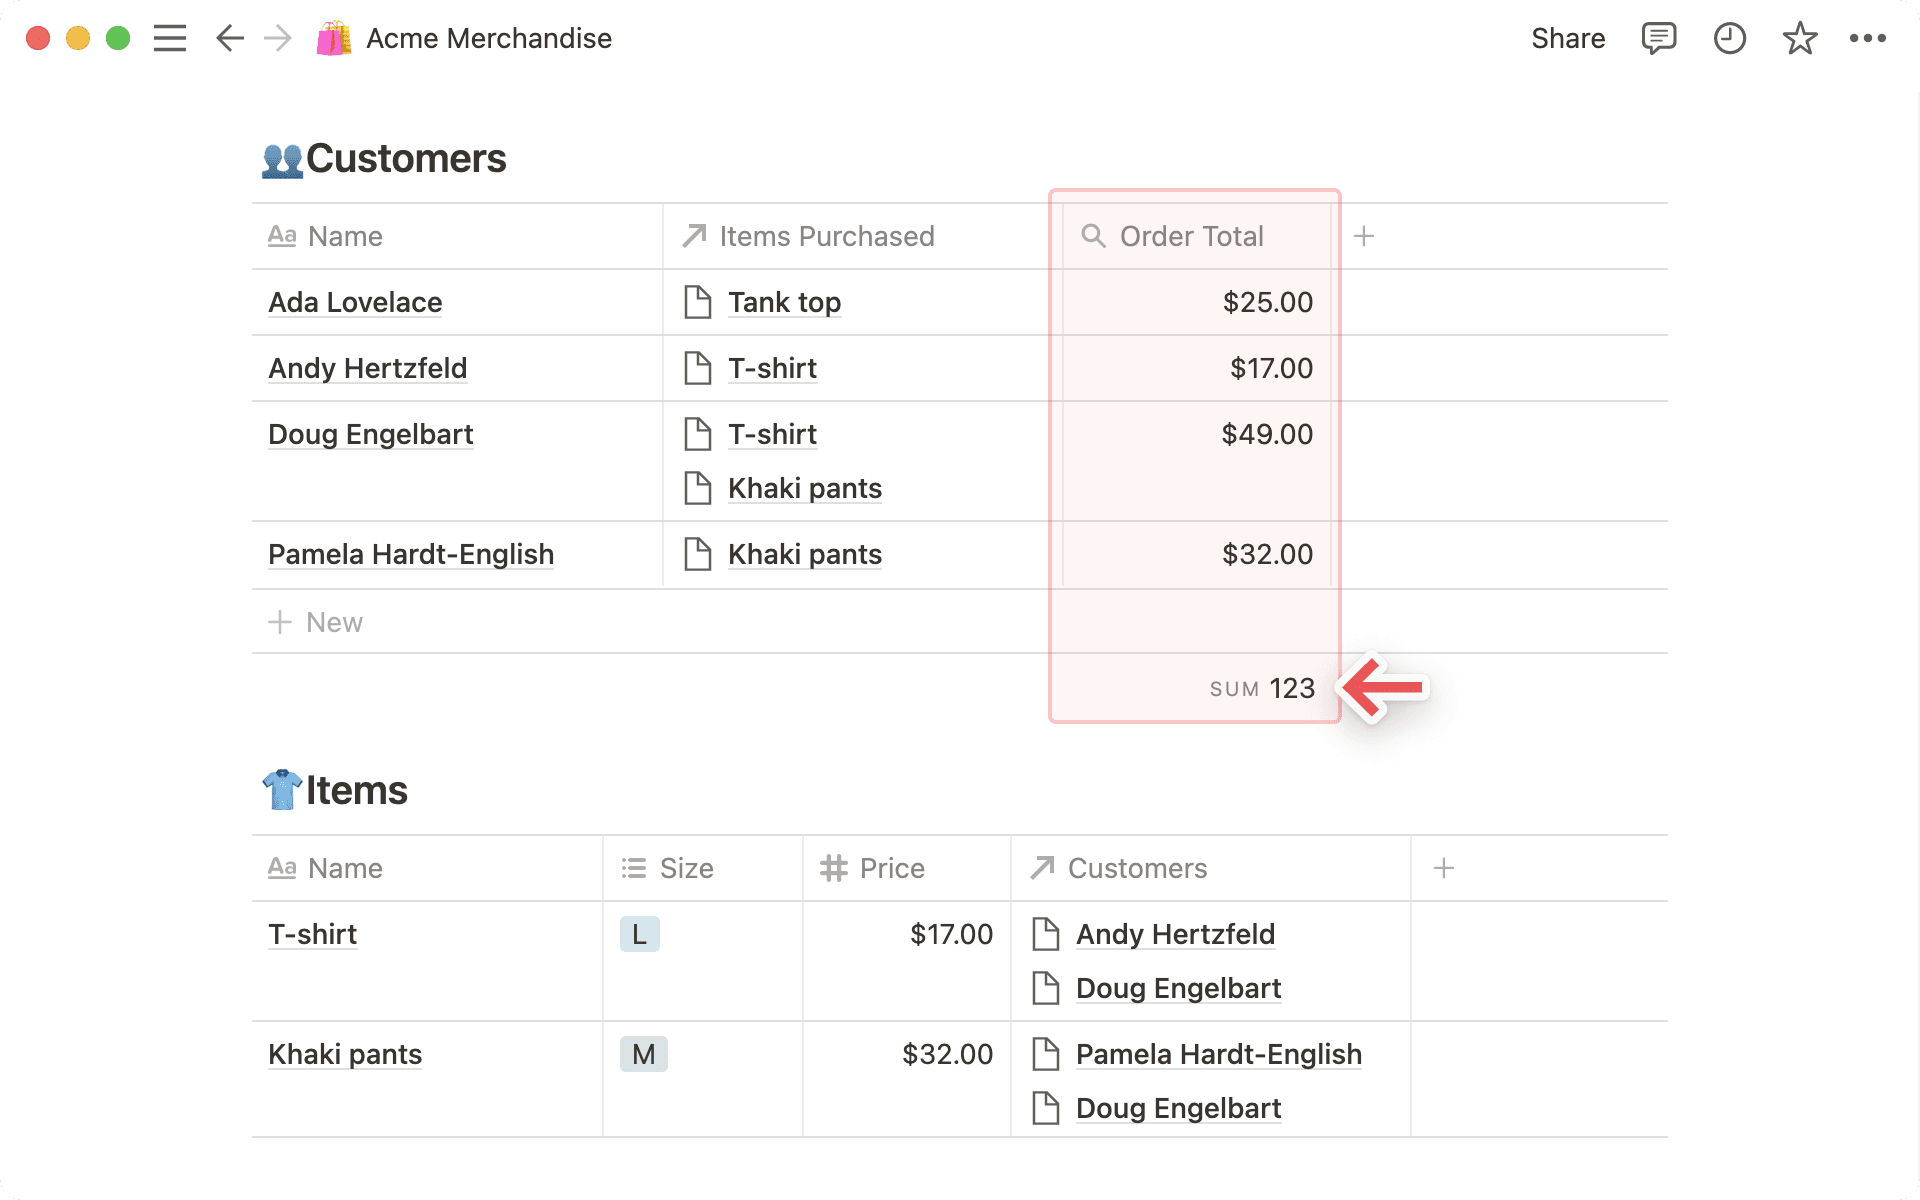
Aggregate rollups
In both tables and boards, you can apply calculations to your rollup column to get a sense of sums, ranges, averages, etc. for your entire database.
Let's say you want to find the total money spent by all customers in our example.
Click the
Order Totalproperty in your customers table.In the menu that appears, hover over
Calculate→More options.Select
Sum.
שאלות נפוצות
האם אפשר לייצא או לייבא יחסים?
האם אפשר לייצא או לייבא יחסים?
כאשר אתם מייצאים מאגר יחס כקובץ CSV, מאפייני היחס ייוצאו ככתובות URL של טקסט רגיל. נכון לעכשיו, לא ניתן לייבא מחדש את קובץ ה-CSV הזה חזרה ל-Notion כדי ליצור מחדש את היחסים עם מאגרי ידע אחרים.
האם אפשר לשכפל מאגר ידע עם יחס?
האם אפשר לשכפל מאגר ידע עם יחס?
כן. בדוגמה שלמעלה, אם משכפלים את מאגר הידע 'לקוחות', מאגר הידע המשוכפל, 'לקוחות (1)', לא יוצג כיחס במאגר הידע 'פריטים'. הסיבה לכך היא שעם שכפול מאגר הידע 'לקוחות', אנחנו ממירים את היחס מסנכרון דו-כיווני לסנכרון חד-כיווני. אם תרצו, תוכלו תמיד להמיר את היחס בחזרה לסנכרון דו-כיווני.
האם אפשר לעשות רול-אפ לרול-אפ?
האם אפשר לעשות רול-אפ לרול-אפ?
למרבה הצער לא, כי זה יכול ליצור לופים לא מכוונים. אנחנו ממליצים להישאר עם רול-אפים של מאפיינים אחרים 😊